An insight into Food Cinematography
- Sep 11, 2017
- 4 min read
I was recently gifted the opportunity to work as the DOP for an online cooking series called “Off the Block”. The series will be out in mid to late October, but the experience so far has placed me in a position where I have had to seriously consider how to bring out the best in these chef’s master pieces. This article isn’t a definitive guide of how to light/shoot cooking programmes or even how to shoot beautifying images of finished plates, but rather a few examples of how I went about achieving the images desired by production on a very small budget, with a very small crew. I won’t pretend to be any expert about the content, but this may be a useful overview of how to create images when shooting food content for those who are unsure of how to go about this.
______________________________________________________________________________
I’ve been very fortunately to have worked with an array of great gaffers over the last few years. One such gaffer, a very friendly gent called Tony, took me under his wing, so to speak, when I was working as a PA on car commercials. Tony helped me to understand how light fell and how it could be shaped in a way in which helped to bring out shapes and exaggerate curves. Fortunately for me, Tony was always more than welcome to offer up his advice, and on the subject of food, he was a bit of an expert. Having worked across Film and Television he said the key to lighting food was a strong back light; quite high and often placed to the side of a plate. So, I used this as my starting point for the first two episodes of “Off the Block".
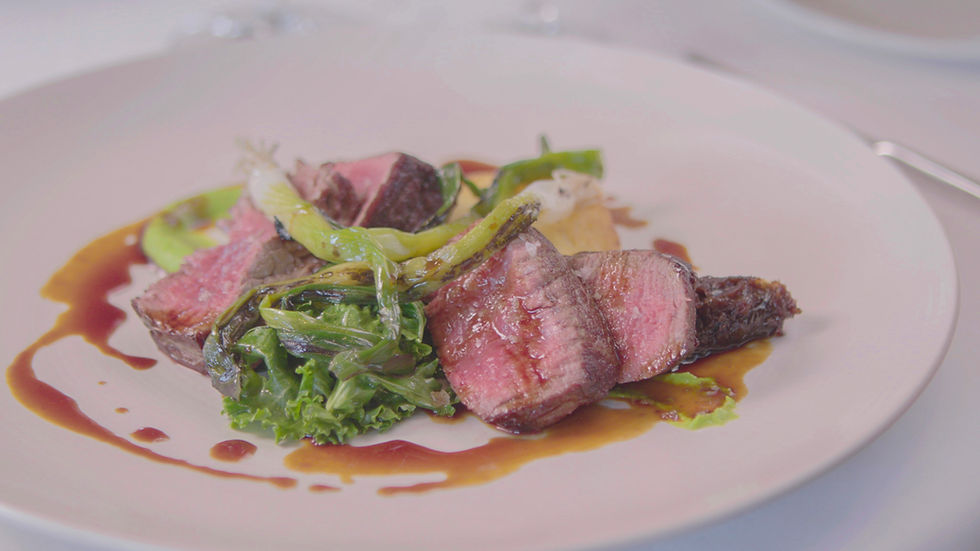
For the first Episode, with the celebrity chef Chris Wheeler, his chosen dish had this juicy quality, with the juices visibly present in the grains of the meat. I started with a strong back light, very heavily diffused. For this, I used an Aputure Light Storm LS 1C at 100% with a quarter stop diffusion on it. This was placed behind the dish, heavily favouring camera left. I found however that the image felt a bit dark, and that it needed a slight lift. To achieve this, rather than placing another panel at the front of the image, I put up a simple poly board bounce, which to my surprise offered just enough light to help pick up the juices of the meat and bring them to life. From a lighting perspective, this was pretty much it, keeping it very simple. We were up against it in terms of time, and with that in mind there wasn’t much room for tinkering, however, this simple set up proved exceptionally effective, and really helped accentuates the shapes and textures of the plate.
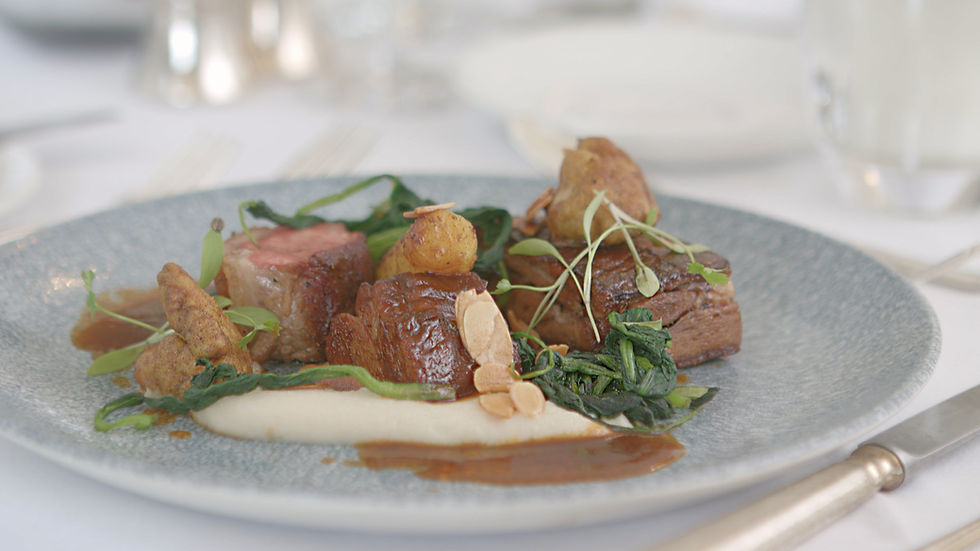
For the second episode, we did something very similar, maintaining a strong back light, except this time favouring the opposite side of the frame. This was shot down in Cornwall where we were blessed with these huge windows throwing lots of natural light across the room. Using this to our advantage, I used the Aputure to simply boost this light and help place it where I wanted it to fall. Once again, we used a bounce to help enhance and shape the plate. This time however, the bounce was placed more to the side of the image. With the bounce directly in front of the plate, the image felt quite flat and didn’t offer the same emphasis on the curves and shapes offered by Chef Dez Turland; who seems to have a real skill for creating structures across the plate. The Saunton Sands Hotel Restaurant also had these huge chandeliers, which, in the above frame you can see offering a slight orange glint to the back of the plate on the left of the frame. Originally, I blocked this out, however I found it helped create another layer to the image, stimulating depth, but also helped to place the dish in a real-life setting. This isn’t a commercial where things need to be pristine, and we didn’t want the final images to look too clinical, but instead let the dishes appear as they would in the environment they are being served in.
For both these episodes, along with previous work involving food and drinks, I tried to stick to using certain focal lengths. For all the food shots for this series so far, we stuck to 50mm and above, whilst making particular use of the Canon 100mm macro for some detail shots. This choice offered what I felt was the right look for the environments we were in, but also helped to crush the background and offered a nice little bokeh, helping to position the plate directly in the eye line of a viewer.


Throughout the series so far, I’ve kept the lens aperture between f1.4 and f2.8 depending on the lens we were using. Unfortunately, due to budget we are limited to photographic glass (Canon L Series), however the quality has still been there, and they can certainly offer excellent images. I intend to write a second post once all the filming for the series is completed, or at least once it has further progressed and I have had time to experiment with some more methods and styles. At the moment both locations have been very similar, so it will be nice to start shooting on the locations which offer a moodier surrounding.
Hopefully this has offered some small, be it limiting, insight into shooting food under certain environments


Comments